Friday, December 27, 2013

Disney Album!

I have taken a number of vacations in the past, and each time I planned to create some sort of travel album....and have never done so :( I have scrapped individual pages, but I have never created a memento album like I have seen so many examples of from other people.

So, for the trip to Walt Disney World we have coming up, I am determined to make this trip the first one that I actually create an album for! I debated on how to create my album. Then I decided to jump on the "Smash book" train (I know I am really late on this, these days everything is all about Project Life instead of Smash but that's ok.)  I created a base album, so that hopefully I can just stick in the photos and journaling.

I first thought that I would bring my album with me and work on it on the trip, but after spending hours on the cover, I really don't see myself now stuffing it in a suitcase or backpack where it could get messed up (especially considering that I already lost a star embellishment off the front). Instead, I will bring a plastic envelope/pouch to collect any ephemera, and a little notebook to take notes. When I get home, I will put it all together!

I started with this base binder:
I chose this one because it was 3-hole (instead of a Smash one, which is spiral bound). I wanted to make sure I could add in my own pages and pockets, and change around the order if needed.

Notes about this binder: I actually felt like it came with too many inside pages for the ring size. I knew that I would be adding a fair amount of bulk to some pages, and adding some pockets, so I took out probably around 1/3 of the pages or more. Unfortunately, this meant breaking up coordinated "spreads." Along similar lines, when I flipped through the pages, the insides of each page kept getting caught by the rings. To remedy that, I sliced off a tiny bit of each page to the left of the hole punches. I feel like had the rings just been a bit bigger, I could have avoided a lot of hassle!

Also, I didn't particularly like the pattern on the cover. You can see that I put my own paper over the whole thing.


Here's a look at my finished cover (minus one star!) and a few inside pages:


I will share the rest once our trip (and then the album itself) is completed!

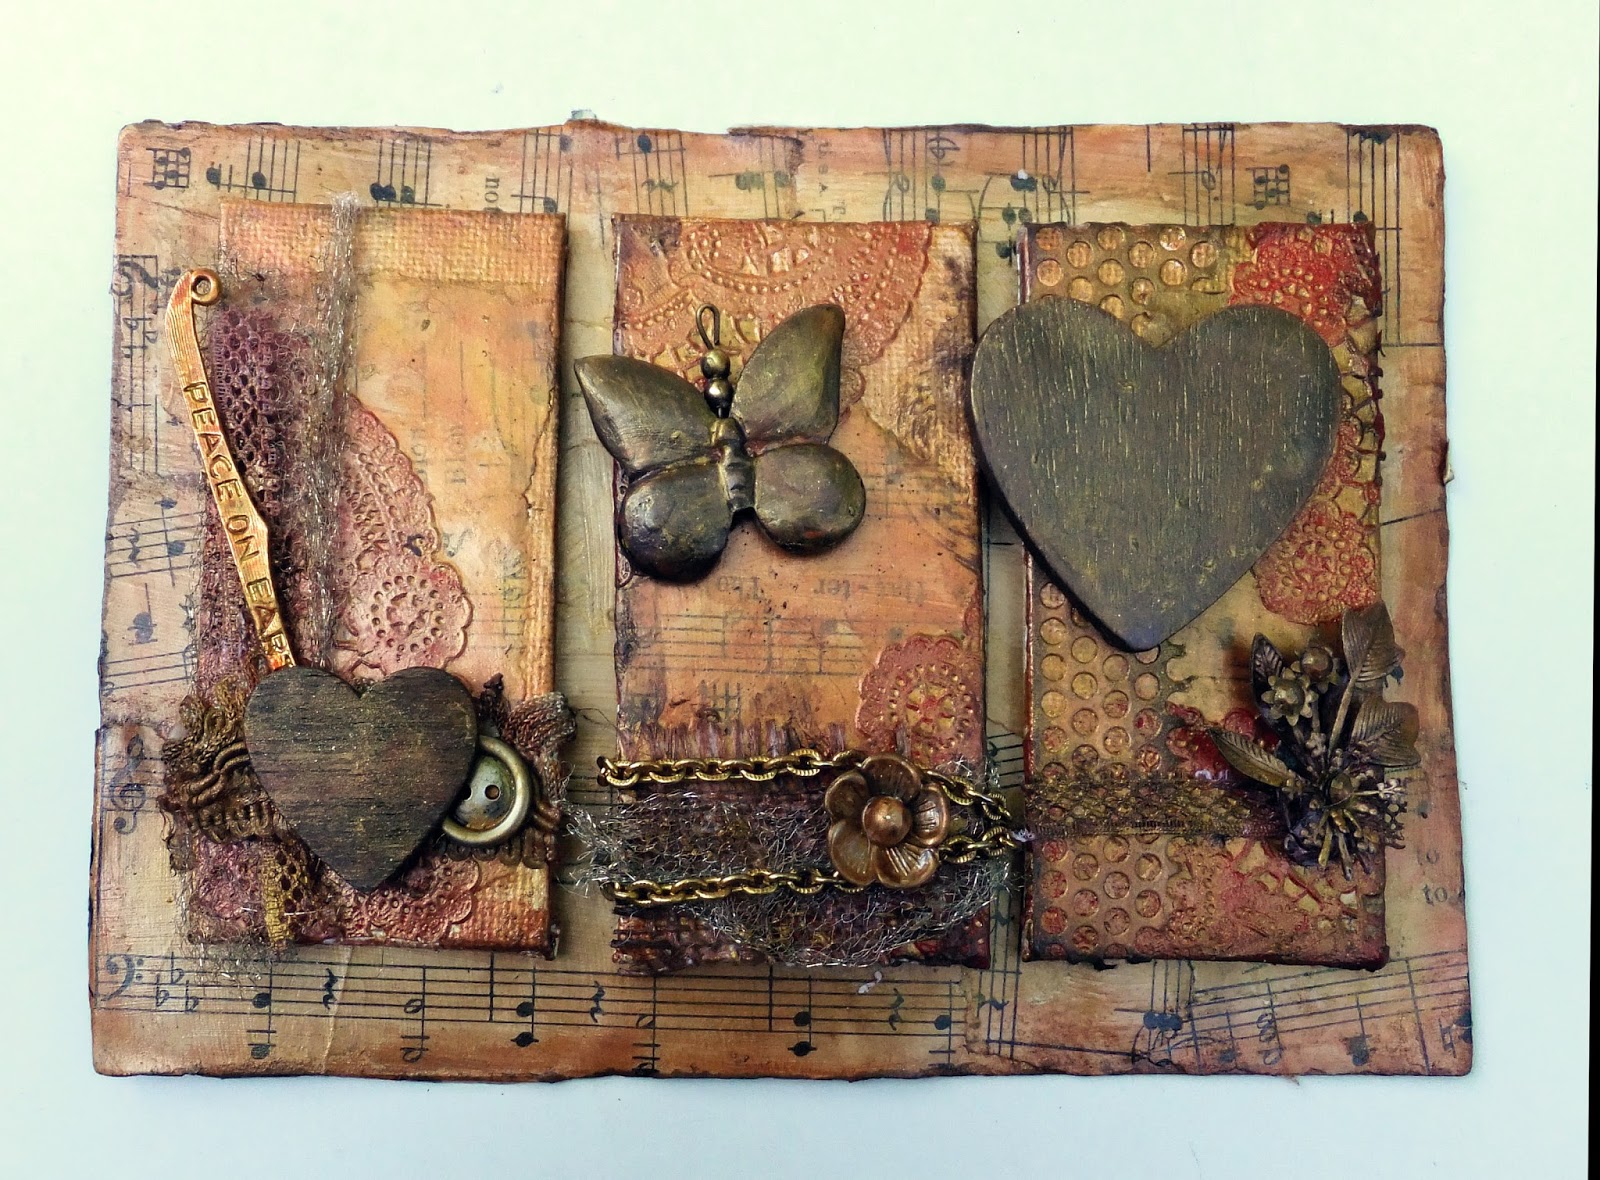
Oh, and one more Disney-related creation....here's a little canvas I made for a friend (sorry about the picture quality, I forgot to take a photo of it myself before I gave it to her, so this is a pic from her phone)


As always, thanks for stopping by!

Saturday, December 7, 2013

Art Journaling in 3 styles

Here are a few pages I've made recently. I have been trying to emulate some of my favorite artists, in hopes that I can become a better artist myself!


This one is a lift of a page by Georgia Heald. Here's my take:


This next one is a lift of a page by Kasia, though I don't think it turned out exactly how I wanted. I am just in awe of her ability to create such gorgeous pages, and have it be all random and messy but still look so amazing. She makes it look really easy, but it is a true talent!

 
And finally, here is a page in the style of Dina Wakely. She is another one who makes it look so easy...but after trying this style, I have learned that I still need some practice! This page might not be finished yet, but I am taking a break on it for now.

I am linking this up to this week's Art Journal Everyday post at Balzer Designs...my friend from my digi days, Melita Bloomer, is a guest blogger there this week!

Saturday, November 30, 2013

More Project Shares

As is my style, I like to save up a bunch of projects and share them all at once, so here goes:

1) I loved my other altered book cover so much, I did it to another one:


Supplies of note: Tim Holtz Ideaology charms, Prima Wood Gears, Finnabair Vintage Vanity flowers, Roman Numerals, and mechanicals, Harlequin Stencil by Crafters Workshop, Luminarte Silks acrylic glazes for color
 
2) I participated in Christy Tomlinson's She Art 3 Workshop several months ago, and here are some results. I am still working on getting faces to look right. 


This last one below was an experiment--I tried making a more traditional face, and hated it, so I painted over it with some strange colors just to see what it would look like...I still might paint over it again, who knows :)


 3)  A few more art journal spreads:

(This layout was very inspired by this layout by by Kasia)
 Supplies of note: Stamps by Stampin' Up, Tim Holtz filmstrip border


 Supplies of note: Prima flower (black and white patterned), Pink Paislee Artisan Chipboard heart, Prima wood gear

I honestly don't have a list of all of the products I used for these, but if there is something specific that you are wondering about, please comment or contact me and I can let you know! I tried to list the manufacturer-specific ones above, but I also use a lot of random stash items and off-brand stuff.

Thanks for stopping by!

Tuesday, October 29, 2013

My Favorite Supplies


Note: I wrote this entire post in 2013 but never published it. I am going to share it in its unedited state now, and then hopefully post an updated version soon. I still like a lot of these supplies, but I have a lot of new things to add now, and a few comments on the below as well.

---
Since I am no longer on any creative teams, I have had some time to play around, just for me, and I also have some time to create some blog posts with more content than just my project shares.

I always think it is interesting to see what supplies other people like/dislike, and why, so I thought I would share my thoughts (I don't know if anyone cares though!)

My favorite mists:
1) Heidi Swapp Color Shine: I love the sheen they have--they are the most vibrant, shiny mists I have.
2) Perfect Pearls: These are great for when I need just a bit of color. I use Heirloom Gold all the time on projects to add just a bit of gold sparkle. I have had no clogging issues at all.
3) Dylusions?: These get a question mark because I honestly had a bad first experience with one of mine (brown). I don't know if it is defective or what, but it often leaves a weird blue cast when on my mixed media pages. I don't seem to have had problems with any other shades. I love the vibrant colors.
4) SEI Tumble Dye: I discovered these from the very talented Roben-Marie. The biggest pro: They are permanent and will not react with water after drying.

My favorite stencils:
1) Harlequin (Crafters workshop)
2) Punchinella (Gauche Alchemey)
My "alternative" textures:
1) Joint tape: I discovered this through Donna Downey. I bought a big roll at Lowe's-
definitely worth the "investment" since I use it all the time now. It's a cheaper alternative to using punchinella (I save the punchinella to use as a stencil/mask)
2) LACE: Any kind will do! Cotton crocheted lace picks up color really well though. If you can find a good deal on a roll or two, pick some up!
My favorite "brand name" embellishments:
1) Heidi Swapp hearts, arrows, etc
2) Vintage Vanity collection
My favorite stamps:
1) Kaisercraft notepad/ledger
2) Stampin' Up texture roller
3) a silicone hexagon pot holder I found at Walmart that works great as a stamp
4) Tim Holtz tiny text
5) Hero Arts script
If I had to pick just 5 stamps to use for the rest of my life, I think I could make do with just these, honestly (maybe an alpha set of some sort too, though :P )

My favorite media:
1) Super Heavy Gel Medium: good for adhering stuff and also for using through a stencil to create texture
2) Luminarte Silks Acrylic Glaze - these things are amazing. They are vibrant but also translucent, they add shimmer, and they come in lots of shades. They are expensive, but worth it! You only need to use a little at a time, too. If you mix them with water or gel medium, you can make them last longer. I have even mixed them with some of the mists from above, and they seem to work fine.
Other tools:
1) Scarlet lime pen: permanent. Just be sure to not run it through too wet of mod podge or medium..and then let it dry...when you go to scrape off the dried bits, the ball part might come out and you will have messy hands and a dead pen :( not that I know from personal experience or anything....
2) Glue gun: I resisted buying one for awhile, thinking I had all sorts of other glue I could use instead...but nothing beats how fast it adheres with relatively little mess to clean up. It can also be used to create texture!

An Art Journal Page

Well, I have actually completed two challenges in a row! Go me :)

I could not get a good photo of this spread--it just looks like puke in every photo I took, but I do like it much better in person. But, I did it for a challenge so I wanted to make sure I posted it (even if I hate the photos).


(If you are curious what the cover of this book looks like, check here!)

Here's the color inspiration, looks like I took some creative liberties on the shade of brown I used, oops!
Be sure to visit the Mixed Media Color Challenge blog!

Thursday, October 24, 2013

Project Shares

Today I have a few more projects I have been working on.

First up, an art journal page! I just love how it turned out. The colors are mostly from Ranger Color Wash, and some Dylusions spray.


And next is something I have been meaning to do for a long time. I have several art journals (like the one above) that are actually old altered books. But until now, I have left their covers blank. But I got bored with that, and am working on altering all of them now. I may end up not liking it (because it means I won't be working on a flat surface), but I just couldn't handle those ugly covers any more.  Here's a look at the first one:


I absolutely love how it turned out! Recently I bought some Cobalt Blue Luminarte Silks Glaze, and it is now my favorite shade, I think. I also used some Vavoom Red, Pumpkin Spice, Sunflower, and Teal on there too.  The stencil I used (Prima/Vintage Vanity) turned out really well too.

Well, that's it for today! I have another altered book in the works, so hopefully I will be back with that soon.

Monday, October 21, 2013

ColourQ Layout - just under the wire!

I made this last Wednesday, but didn't have time to photograph it and post it until tonight! Here's my layout:


At first, it was looking a bit too Halloween-y with the orange and green, so I added the pink heart and emphasized pink and green more.

And here's the inspiration image from the ColourQ Challenge #211.

If you hurry, there's still time to enter!

Sunday, October 13, 2013

October Projects and a challenge entry

Hi everyone, time for a few more project shares. Sorry for all the photos...apparently I like to save up a bunch of projects to share all at once :)

1. Two crosses:
I made these as possible decorations for a new church that I am helping to "plant." I had a lot of fun mixing random junk pieces and bought items (like Finnabair's Mechanicals and Vintage Vanity, etc).

I used Luminarte Silks to color them.

The first one is a small 6x8 (?) canvas:

 and then a much larger 16x20in one in the same style:


2. Next, I wanted to use the Finnabair style for a canvas with one of my photos. I don't love the result, but I guess it turned out ok. That's me at the Colosseum in Rome.


3. The other day, I ran across this site: Scrapbook Diaries. I absolutely love the mixed media-style layouts that are featured there, and I am definitely planning on buying a kit at some point. In the meantime, I checked out the Live with Prima section, and this canvas stood out to me: Treasure Canvas with Kasia Krzyminska.

I have a new blog and artist to inspire me now! I have already pinned a lot of Kasia's art journal pages, but never spent a long time perusing her blog until this week. She is one of those artists where every single project of hers, I just LOVE and it makes me want to start creating my own versions right away.

I love her work so much that I signed up for this workshop: Pop and Colours (where she is one of the featured designers). I am excited for it to start next week!

So, I watched the canvas video through once, and then again while creating my own version. Here's my take on it:


 4. Finally, I created an art journal spread for Challenge #9 at A Mixed Media Color Challenge.

I have wanted to enter one of their challenges (since entering the first one) but have always gotten too busy and missed the deadline! Finally I was able to finish one in time:


 Whew, I guess that is it for now! Thanks for stopping by.


Tuesday, September 17, 2013

Creative Updates

As we are somewhat nearing the end of 2013, I wanted to take a look at my goals for the year to see how I am doing (while I still have time to accomplish a few more of them).

Here's what I said in Dec 2012:
1. Finish my December Daily. - nope, nothing on this yet, hopefully will get back to it as we approach the holiday season again.
2. Get published. - completed! published in the Sep2013 issue of Somerset Digital Studio
3. Learn to take better photos of my projects (perhaps make a lightbox?). - nope, haven't really done anything with this one
4. Create at least 1 project a month just for me/or for a non-required challenge. - not sure, but I have been able to take a workshops and classes just for fun this year
5. Make at least one Project: Life style spread (digital or traditional). - nope
6. Join a product design team. - nope (not sure I still want to do this one anymore)
7. Organize my craft room. -somewhat, it is definitely getting better than it was!
8. Try a new technique from by Pinterest techniques board (or elsewhere) at least once a month. - not really, but taking workshops kind of fulfilled this one in part


Ok, so I really thought I was doing better than that so far.  My altered art workshop, my workshop with Finnabair, creating in the craft room at GenCon, and having some friends over to "art" with me were all highlights of my creative year, but I wouldn't have necessarily known to list them as a goal last year (if that makes any sense).

I have scaled back on creative/design teams and since doing so, I have been able to try some other things I have been meaning to do, like create some art for The Resistance, and I even started some handmade Christmas gifts!


Ok, now for some art:


1) A peek at the article in Somerset Digital Studio


2) A digital art collage using products by Captivated Visions. I actually did an interview for her recently, check it out here

3) The journal I made at the amazing workshop with Finnabair:


4) A scrapbook page I made using mostly 7 Dot products:


5) My winning project at the GenCon open craft room: